- OS: Ubuntu 14.04 LTS server.
- VirtualBox Network Interface 1: Bridge mode; mapping to Ubuntu Eth0
- VirtualBox Network Interface 2: Internal mode, Set Name as "MAAS"; mapping to Ubuntu Eth1
- IP Address: 192.168.1.1
- DHCP: isc-dhcp-server (The detailed settings please refer to here)
- TFTP: xinetd (The detailed settings please refer to here)
The detailed installation and configuration of PXE Server on Ubuntu by below steps.
- Install and configure apache2 package
- Config xinetd tftp
- Copy Ubuntu Installation files to PXE Server
- DHCP Server Configuration
- VirtualBox PXE Client Configuration
- Power on VirtualBox PXE Client
Install and configure apache2 package
In this example, we'll use an WWW (apache) server as an installation server.
- At a terminal prompt, enter the following command to install apache2:
sudo apt-get install apache2
- Modify /etc/apache2/apache2.conf file and add the following line into it:
sudo vim /etc/apache2/apache2.conf
ServerName localhost
- Restart the apache service
sudo service apache2 restart
Config xinetd tftp
- Edit file /etc/default/xinetd,
sudo vim /etc/default/xinetd
- Add the following lines to enable TFTP server.
RUN_DAEMON="yes"

OPTIONS="-l -s /tftpboot"
- Edit file /etc/xinetd.conf and scroll down to the end. Modify or add the following line.
sudo vim /etc/xinetd.conf
tftp dgram udp wait root /usr/sbin/xinetd /usr/sbin/xinetd -s /tftpboot
- Restart tftp service:
sudo service xinetd restart
Copy Ubuntu Installation files to PXE Server
- Click insert ubuntu-14.04.3-server-amd64.iso file into CD-ROM from VirtualBox control panel.
- Mount /dev/cdrom on /mnt directory
mount /dev/cdrom /mnt
- Copy the required files from the ISO image to /tftpboot directory.
cd /mnt
sudo cp -fr install/netboot/* /tftpboot/
- Create a directory called ubuntu in the apache root document folder.
sudo mkdir /var/www/ubuntu
- Copy all the files from the Ubuntu ISO to the apache root document folder.
sudo cp -fr /mnt/* /var/www/ubuntu/
- Change the authority of syslinux.cfg
sudo chmod 777 /tftpboot/ubuntu-installer/amd64/boot-screens/syslinux.cfg
- Edit file /var/lib/tftpboot/pxelinux.cfg/default and add the following contents at the end. Make sure you’ve replaced the IP address with your own.
sudo vim /tftpboot/pxelinux.cfg/default
[...]

MENU TITLE Welcome to PXE Server System


LABEL linux

        MENU LABEL Install Ubuntu from PXE server

        kernel ubuntu-installer/amd64/linux

        append ks=http://192.168.1.1/ks.cfg vga=normal initrd=ubuntu-installer/amd64/initrd.gz

ramdisk_size=16432 root=/dev/rd/0 rw  --
- Note: If you use 32-bit edition, you should change the kernel path in the about directory with correct path.
DHCP Server Configuration
We have to configure the DHCP server to work with PXE server.
- Edit file /etc/dhcp/dhcpd.conf,
sudo vim /etc/dhcp/dhcpd.conf
- Add the following lines at the end. Make sure you’ve replaced the IP address with your own.
allow booting;

allow bootp;

option option-128 code 128 = string;

option option-129 code 129 = text;

next-server 192.168.1.1;

filename "pxelinux.0";
- Restart DHCP server
sudo service isc-dhcp-server restart
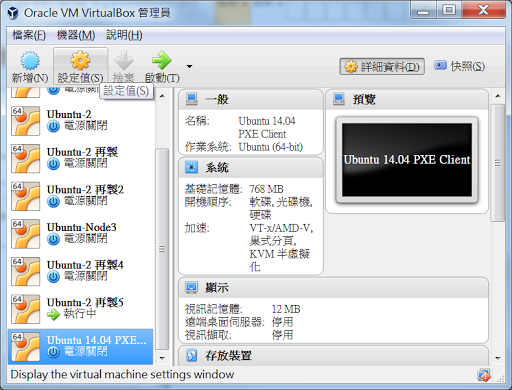
VirtualBox PXE Client Configuration
I create a Virtual Machine client on my VirtualBox.
- Open VirtualBox and click on the New button in the menu bar.

- Enter the Virtual machine name "Ubuntu 14.04 PXE Client".

- Enter the RAM size to the Virtual machine.

- Select "Create a virtual hard drive now" option and click Create.

- Select the "VDI (VirtualBox Disk Image)" option and click Next.

- Select "Dynamically allocated" since the new virtual hard drive file should grow as it is used.

- Enter default Virtual hard drive size "8G" option and click Create.

- Select the System tab on the left, enable Network from the boot order option, and disable another boot order options on the right side.

- Select the Network tab on the left, enable Interface 1, select "Internal" from Attached to, select "MAAS" from Name list, and click OK.

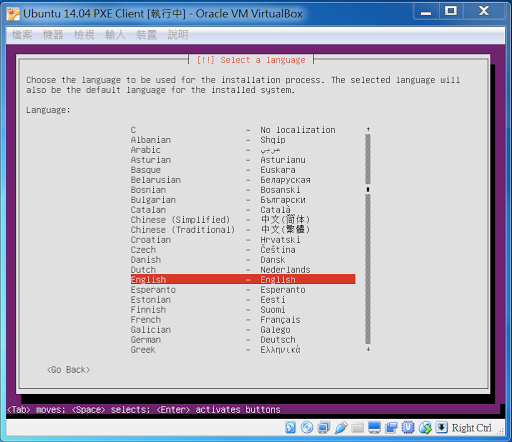
Power on VirtualBox PXE Client
Power on the Virtual PXE client system. You should see the following screen.

And you could find the message "Welcome to PXE Server System" and the last one label "Install Ubuntu from PXE server" in the screen. That is what we add "MENU TITLE" and "MENU LABEL" in /tftpboot/pxelinux.cfg/default file.
Select "Install" label, you should see the following screen for a while. And you could install Ubuntu by default.
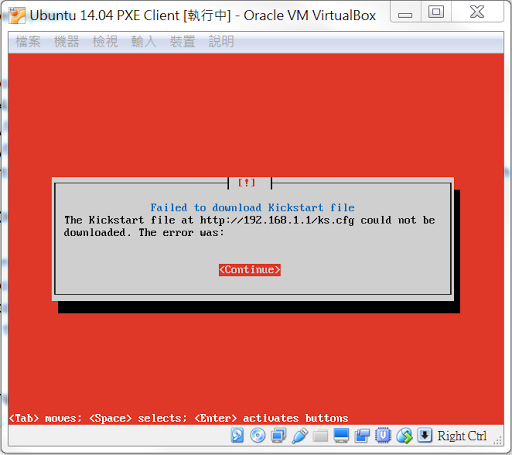
But if your select the label "Install Ubuntu from PXE server", you will see the following screen, since we didn't set Kickstart file (ks.cfg) yet. And I will edit Kickstart file (ks.cfg) in the next article.
- Unixmen -《Install And Configure PXE Server On Ubuntu 14.04 LTS》
- 鳥哥的 Linux 私房菜 -《2. 用 kickstart 大量部署用戶端 Linux CentOS 系統》
Jose’s Google+ profile
沒有留言:
張貼留言